Stickies Tools
SSIT
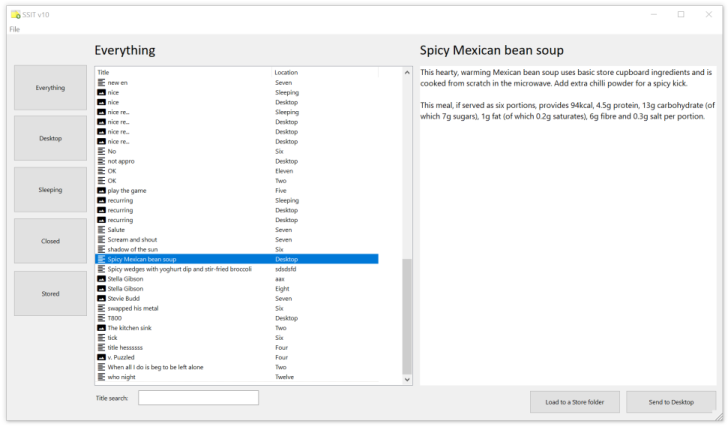
SSIT is the "Stickies Selective Import Tool". It can help you recover Stickies data from a backup, or if you've lost notes.
SSIT will open any Stickies data file, either a current file or a backup, and list the notes it contains. The notes, and information about them can then be viewed, and SSIT can then transfer the information from the items you choose directly into Stickies. Instructions for how to use it are included in the text file in the download.
To perform a restore of all Stickies data from a backup, use the Restore command in Stickies, but to either browse a backup, or to selectively choose items to restore, use SSIT.
For opening backups from Stickies v4 to v9, use SSIT
For opening backups from Stickies 10 onwards, use SSIT10
Scoop
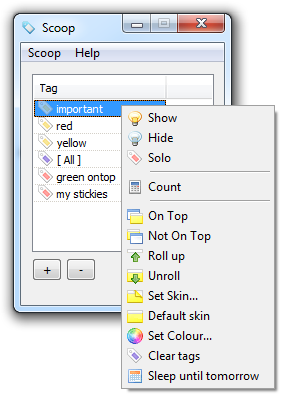
The Scoop add-on allows you to assign tags to Desktop notes, and then perform actions to all notes with a tag at a time. This means you can create and name a tag, give it to the notes you choose, and then perform actions to notes with that tag, like hiding/showing, or rolling/unrolling.
You can also create a "smart" tag, which automatically includes all notes with a certain characteristic - all those which are a certain colour and on-top and contain a text string, or all image notes which are not rolled up, for example. Right-click either type of tag to perform an action to all those which are belong to that category.
When Scoop is running, the note right-click menu will have an extra item added to it, "Set Tag". Choose this to assign a manual tag of your choice to that note.
You can choose which action is performed when you double-click a tag in the Options.
Scoop accepts command line parameters:
-show
-hide
-ontop
-notontop
-rollup
-unroll
-clearskin
-cleartag
-sleeptomorrow
-toggleshowing
-solo
-ghoston
-ghostoff
So, running:
scoop.exe -rollup Blue Notes
will cause all notes with the tag "Blue Notes" to be rolled up. The tag can be either a smart tag, or a manual tag.
Some Scoop data is stored in the main Stickies data file using the "userstring1" data area, the rest is in a file
named scoop.ini kept in your Stickies data directory.
Versions
- 22/07/2010 - v1.00 released
- 02/11/2010 - v2.00 released, changing "category" to "tag", and introducing user-defined smart tags. Pressing Return performs the same as double-clicking
- 20/01/2011 - v2.10 released, adding a command to turn ghost mode on and off
- 20/01/2025 - v2.10 re-released, this time including the "it's completely broken for about a decade" bug fix
sticky.exe
To help Stickies get integrated with third party programs, I wrote sticky.exe. Examples of execution are as follows:
C:\>sticky 127.0.0.1 This is the text.^MThis is another line.
This will send a note to the IP address 127.0.0.1 (which is always the machine on which the command is executed, as is the string
localhost) with the text following it. The ^M is replaced with a newline character, so that the two sentences
will be on separate lines. If you're using this from the command line, you might also need to escape the caret, so you insert a new line
with ^^M.
C:\>sticky 127.0.0.1:45678 -file filename.ext
This time, rather than specifying literal text, instead the file filename.ext will be opened, and the contents will
be sent. The alternate network port of 45678 is also used.
C:\>sticky 127.0.0.1 -file sticky.sti
This final mode comes into play when the filename you pass to sticky.exe has an extension of .sti. When
this is a .sti file saved from Stickies, the note colour, title and formatted text content is read from the file.
Other command line options are:
-user1 (sets user variable 1 to true)
-user2 (sets user variable 2 to true)
-user3 (sets user variable 3 to true)
-secret (sends the sticky in secret mode)
-width (auto-sizes the sticky on receipt)
-source (sets the sender - only honoured by Stickies when they arrive from the local machine; the source IP address must be 127.0.0.1)
The format for using the command is then:
sticky.exe destination[:port] | "Friend Name" [-user1] [-user2] [-user3] [-secret] [-width] [-source source_name] [-file file.ext | text]
The utility returns an ERRORLEVEL of 0 if the note was successfully sent, and 1 if there was a problem.
Although not all options have to be specified, they must be used in the order above.
UnixSticky
UnixSticky has been written by Nicolas Fradet
It works with Gtk::Perl and xinetd. The file Sticky is to be placed in your xinetd.d directory after
you have corrected the path to StickyServ.pl inside. The friend list is a file placed in
/etc named Sticky.conf formatted like:
name=IP name=IP ...
This file must be readable to the end-user.
Another thing is executing xhost +local: to permit Sticky popups once per boot.